Go home
Go back to other tutorials
How to build HARBOUR to compile PRG for Android
in console mode (Windows version)
Giovanni Di Maria - calimero22@yahoo.it
since: May 23, 2014
Tutorial
This Tutorial:
Rev. [1] - May 23, 2014
Rev. [24] - Jun 7, 2014
Introduction
This is a short but simple tutorial that explains how to compile Harbour from source,
for Android system, in Windows. It explains also how to use Harbour to compile your programs,
to use them on your Android Tablet & C.
It's specifically written for beginners that initially encounter some difficulties,
building Harbour. Many guides on the Internet are complicated and have the defect of presenting
the subject in a confused manner.
The biggest flaw is to show many environment variables and paths to be set, even if they
are not needed. In this way the beginners become discouraged and leave the idea of compiling
Harbour. This tutorial explains just the basic facts, reducing the rules to follow.
Be careful. The name of folders might change with the various distributions of the programs.
Giovanni Di Maria
Legal Notices
This tutorial is a free document and will remain free. You can view, use, print and
redistribute it and/or modify it, without any limitations.
Download Android NDK
- Download last Android NDK from https://developer.android.com/tools/sdk/ndk/index.html. It's huge.
- Unpack it to c:\android-ndk-r9d folder (or other one).

Download Harbour sources
- Download last Harbour sources from https://github.com/harbour/core/archive/master.zip.
- Unpack it to c:\core-master folder (or other one).

Compile normally Harbour
- Open a console window, with the menu Start -> Run -> cmd
- Go to folder of sources of Harbour, by typing cd c:\core-master (or other specified)
- Set path for GCC: PATH=C:\hb32\comp\mingw\bin. You must first install GCC (Harbour nigthly has a copy of GCC)
- Set an environment variable: SET HB_INSTALL_PREFIX=c:\harbour
- Type the command win-make install, followed by "Return" key, to start the building. This process could take long time
- At end, close the console window by typing "exit" and press "Return"

Compile Harbour for Android
- Open a console window, with the menu Start -> Run -> cmd
- Go to folder of sources of Harbour, by typing cd c:\core-master (or other specified) and issue these commands followed by "Return":
- set HB_INSTALL_PREFIX=C:\harbour-android
- set HB_PLATFORM=android
- set HB_COMPILER=gccarm
- set HB_CCPREFIX=C:\android-ndk-r9d\toolchains\arm-linux-androideabi-4.8\prebuilt\windows\bin\arm-linux-androideabi-
- set HB_HOST_BIN=C:\harbour\bin
- set HB_USER_CFLAGS=--sysroot=C:\android-ndk-r9d\platforms\android-9\arch-arm
- set HB_USER_DFLAGS=--sysroot=C:\android-ndk-r9d\platforms\android-9\arch-arm
- set HB_USER_LDFLAGS=--sysroot=C:\android-ndk-r9d\platforms\android-9\arch-arm
- win-make install
- At end, close the console window by typing "exit" and press "Return"

Compiling a PRG for Android
- Open a console window, with the menu Start -> Run -> cmd
- Go to you work directory, with the command cd \test (for example) and press "Return"
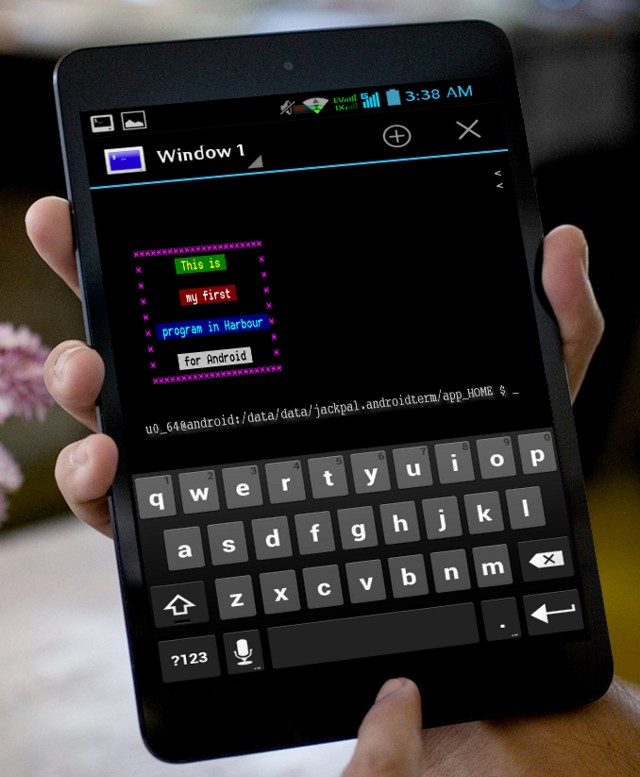
- Create a PRG file, for example, "Hello World" and name it myprog.prg (for example):
FUNCTION Main()
   CLEAR SCREEN
   @ 02, 03, 10, 25 BOX "*" COLOR "rb+/n"
   @ 03, 10 SAY " This is " COLOR "rg+/g"
   @ 05, 10 SAY " my first " COLOR "w+/r"
   @ 07, 05 SAY " program in Harbour " COLOR "gb+/b"
   @ 09, 08 SAY " for Android " COLOR "n/w"
   @ 13, 10
   RETURN NIL
- Issue these commands followed by "Return":
- set HB_INSTALL_PREFIX=C:\harbour-android
- set HB_PLATFORM=android
- set HB_COMPILER=gccarm
- set HB_CCPREFIX=C:\android-ndk-r9d\toolchains\arm-linux-androideabi-4.8\prebuilt\windows\bin\arm-linux-androideabi-
- set HB_USER_CFLAGS=--sysroot=C:\android-ndk-r9d\platforms\android-9\arch-arm
- set HB_USER_LDFLAGS=--sysroot=C:\android-ndk-r9d\platforms\android-9\arch-arm
- path c:\harbour\bin
- hbmk2 -w3 myprog.prg
- The compilation will create a binary file for Android, named "myprog"


Copy and Execute the application on Android
- Copy your application to Android, to folder /mnt/sdcard/Download
- On Android install and run Android Terminal Emulator (ATE)
- Type cd and press "Return". Current folder HOME is executable
- Type chmod 775 . and press "Return". (Dot at end)
- Copy your application to Android file system with: cp /sdcard/Download/myprog . (Dot at end)
- Type chmod 775 myprog to change permissions to your application
- Execute your program with ./myprog
- Enjoy!!!

Appendix A - Contributors
- Giovanni Di Maria (he is still the main developer)
- Massimo Belgrano (he gives very useful help and tips)
Appendix B - What users think
- Excelente, muchas gracias Giovanni!! (Daniel Medina)
- Finally Giovanni, you made it. Thank you and congrats. (Danny Dp)
- Excelente..... gracias desde Colombia.... (Juan Carlos Escobar Rozo)
- AhÝ esta el tuto Roman Patrick Flores Gomez gracias Giovanni Di Maria saludos desde Mexico. (Juan Rendon)
- Bien. (Roman Patrick Flores Gomez)
- Amazing Giovanni.. this is something many programmers waiting for.. Muchos gracias! (Biro Zoltan)
- Thank you, giovanni. (Alejandro Padrino)
- Great. (Massimo Belgrano)
- Nice tutorial. Thanks! (Qatan)
- It is both an important and a great step forward and also another small step forward. (Rafal Jopek)
- Sir, I am happy. My prog is run on android. You are great. Thank you for help me. Thanks & Regards. Kamlesh.


